Introduction to GIT
Quite a few introductions to GIT are already available on the internet and in books. Check out the references at the end of this text. Here we describe some basics about GIT that should help us to use GIT within our group.
The Big Picture
Consider the following scenario: you have a collection of files and directories that you need to keep track of. As you maintain those files over time they change. Files come and go and their contents changes as new features are added and bugs are fixed. From time to time you keep snapshots (e.g., without GIT these would be tar- or zip-files) so you can go back to some earlier stage in case a new idea turns out to be bad. Or you like to try out different ideas separately from each other (i.e., in two branches) and later when both are mature you like to merge them into the main project. Part of your project history might look like the following picture.
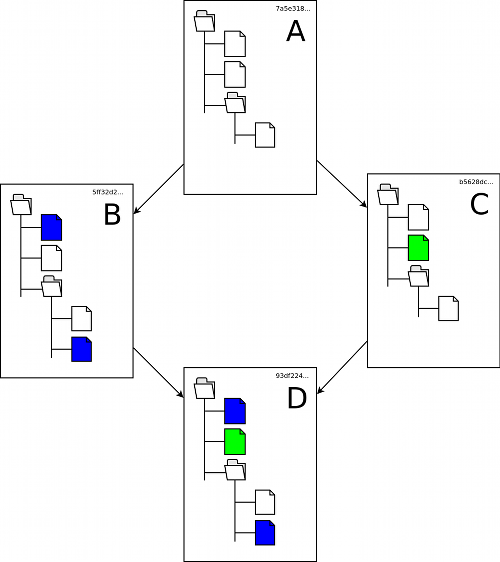
The colored files indicate changes and additions. The collections labeled A, B, C, and D are snapshots of the project which in a traditional, manual setup you would keep in tar-files like my-project-A.tar.gz, etc. (and in GIT parlance you could use tags instead).
In this scenario GIT will help you keep track of the snapshots (called commits by GIT) automatically. It will do this in an efficient way to save space and time and it will keep track of the history including which snapshot branched off from which parent snapshot. GIT uses its own internal labeling with SHA1 hashes (40-digit hex numbers, indicated as the small text in the above picture). This makes all GIT objects (files, commits, etc.) globally unique. At the same time an object is stored only once if it is the same (i.e., a file that does not change over time).
Making Changes
When working with the file of your currently checked out files you need to tell GIT which files should change for the next commit. For this you use the commands git add and git rm. With git add you can add new files or tell GIT to replace an existing file with a newer version. With git rm you tell GIT that a file should not be included anymore in the next commit. Moving (or just renaming) a file is technically a combination of adding the new file and removing the old file even if the contents is the same. For convenience you can use git mv to do this in one go. Internally GIT uses a smart data store (through compression, SHA-1 hashes, and pack files) in order to reduce the space needed regardless of file names. This makes git mv a rather cheap change in a commit.
Here are some examples.
- edit and add
file1.txt
$EDITOR file1.txt
git add file1.txt
- remove file2.txt
git rm file2.txt
- adding all changes in files within
directory1(recursively)
git add directory1
Note that GIT does not track directories directly but only as required to hold the files within them. I.e., an empty directory does not get recoded by GIT at all. If you want to force tracking a directory you need to create a dummy file within the directory. E.g. if you want to track an otherwise empty directory2 you need to do
touch directory2/.git-keep
git add directory2
Instead of .git-keep you can take any other convenient file name.
These add and rm will not immediately be recorded in a new commit but they are collected in a sort of cache called the index. While you may (and should) record small change sets in a commit you should also make sure that each commit represents a meaningful state of your collection of files. In other words, if at some time you like to check out a particular commit (or analyze the difference between two commits) each commit should represent the collection of files of the project at the given stage.
After you have recorded all the changes you can create the new commit.
git commit -m 'meaningful summary of changes'
You can have multiple messages with multiple -m options or you can leave out the -m option to add the comments in an editor.
At any time the command
git status
will indicate files that are ready to be committed and others which have changed but have not been added to the commit cache (or index). You need not include all changed files in a commit.
The command
git diff
shows a unified diff of all the pending changes.
Working with Repositories
There are several ways to organize GIT repositories depending on the type of collaboration and the practical use.
Single Repository Coupled with the Project
If all you want is to keep track of changes of some files in a project, then you want to use the simplest form of a GIT repository, namely to keep the repository together with the project. The basic steps to set up the repository in this case are:
cd /path/to/my-project-dir
git init
git add .
git commit -m 'initial commit'
Instead of git add . (note the dot at the end of the command) you may want to add files individually with git add file. In addition you may want to read about the .gitignore (see man gitignore) to exclude some files according to patterns. See also our gitignore hints.
For some projects this is all you ever need as a repository. However, this setup can easily be the basis of a more distributed development model later on as described below.
Synchronizing Production and Developer Copies
Let's say you have some files on a production system that you need to maintain properly. Typical examples are the configuration files of some software or some files for a web site. You want to keep track of the changes so that you can revert them if necessary and you want to edit them outside of the production environment an synchronize them only when they are ready.
GIT calls duplicating one repository (i.e. the production copy) into another (i.e. the developers copy) cloning and the subsequent synchronization pulling. If need be pulling can even be done as two separate steps, namely fetching and merging. Doing the steps separately allows for better control whereas the combined pulling is usually more convenient. This leads to the following picture with one or multiple developers:
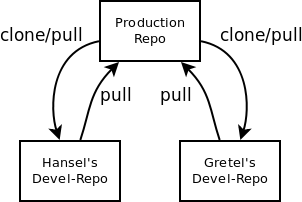
As an example let's suppose you want to maintain our Xymon configuration on xymon.phys.ethz.ch:/etc/xymon and you want to keep the developers copy in the (existing) directory /home/hansel/git assuming you have root access to the configuration files via ssh. This is how you set up your developer copy:
cd /home/hansel/git
git clone root@xymon.phys.ethz.ch:/etc/xymon
You also need to register your developer copy with the production repository:
ssh root@xymon.phys.ethz.ch
cd /etc/xymon
git remote add hansel hansel@login.phys.ethz.ch:/home/hansel/git/xymon
You can then work inside /home/hansel/git/xymon (editing, adding, committing). To keep your developer copy current do
git pull
regularly. To synchronize the finished work back to the production repository do
ssh root@xymon.phys.ethz.ch
cd /etc/xymon
git pull hansel master
If your editing session on the development repository took a bit longer it is recommended to do another pull before synchronizing back on the production repository.
Synchronizing Several Equivalent Copies
If you want to keep multiple copies synchronized possibly working on different branches/versions of your project, you want to use a bare repository. This setup is most closely related to the traditional version control systems with a central repository. Typical examples are if you want to have the same collection of files on different computers (e.g., a desktop and a mobile computer) or if several members of a group share the same central repository. Every user/computer involved needs to have read/write access to the bare repository.
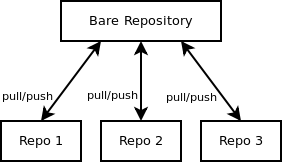
A bare repository just contains the contents of the .git directory and no checked out branch. This allows to push any branch as opposed to the normal case where a push into checked out branch is forbidden. Bare repositories are typically named like my-project.git rather than my-project/.git as they don't need the parent directory to check out a branch.
To create the bare repository do
cd $BARE_REPO_DIRECTORY
git init --bare my-project.git
where $BARE_REPO_DIRECTORY is a path to a directory which all participants can access either directly through the file system or via ssh. Then create the first repository and add all the files you want to have in the initial commit. Create the initial commit and push it to the bare repository.
cd $PROJECT_PARENT_DIR1
git clone $BARE_REPO_DIRECTORY/my-project.git
cd my-project
 # move files here, and/or extract tar file, and/or edit files
git add .
git commit -m 'initial commit'
git push origin master
The git clone command in this will display a warning that the repository is still empty. Typically, this will be on a computer different from the one holding the bare repository so $BARE_REPO_DIRECTORY/my-project.git will be an ssh URL of the form user@login.phys.ethz.ch:/path/to/repo/my-project.git
All other repositories are then created by cloning from the bare repository now holding the initial commit created above. This may be on a third computer.
cd $PROJECT_PARENT_DIR2
git clone $BARE_REPO_DIRECTORY/my-project.git
On any of the developer's repositories the typical commands are then
git pull
 # edit files
git add <file>
 # or
git rm <file>
 # as many times as needed
git commit -m 'meaningful comment for changeset'
git push
If you regularly pull and push the changes form all of the cooperating repositories you will have them synchronized.
Collaborations between Developers
This is the typical setup for distributed version control systems. You may not want to give out write access to your repository but you still want to collaborate. It turns out that read access is all you need if all participating parties (at least those who contribute) maintain their own repositories and just grant read access to the other members of the team.
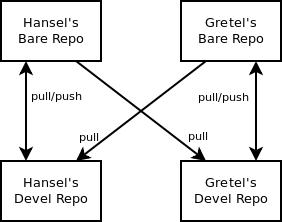
Each bare repository is treated like the central repository described above (albeit with only one user who has read/write access). Additionally, the other repositories are added as remote repository.
cd ~hansel/path/to/git/project
git remote add gretel $GRETEL_URL
where $GRETEL_URL is some way to access the other developers repository read-only. This can typically be direct file system access or via the HTTP or git protocols.
Branching and Merging
The above scenarios with remote repositories are already using branches. Each remote repository is technically a different branch and pulling will merge the remote branch. By separating git pull into the equivalent two commands git fetch ; git merge this can be made explicit.
You can also use branches within a single repository. A typical session creating a branch called new-idea which is merged back into the master branch after some editing and testing might look like this:
git branch new-idea
git checkout new-idea
 # edit files and test the result
git add .
git commit -m 'new idea implemented'
git checkout master
git merge new-idea
On a production system be careful not to check out just any feature branch. Normally you will want to always use the master branch on the production system and work on the remote repository like described above to develop some new ideas.
The commands
git remote
git remote -r
git remote -a
will list all branches (local, remote, or both)
GIT Housekeeping
GIT by default will already save space in its repository structure in the .git directory. It tries to strike a balance between packing the repository and being fast with regular GIT activities. Over time it collects its history in a way that can be further packed. You can tell GIT occasionally (e.g., after every 100 commits or so) to do some garbage collection or to repack its repository.
git gc
will get rid of objects that are not reachable anymore and try to compress the remaining objects better by removing redundancy.
git repack
will put the currently used object into GIT's efficient pack format.
Quite often GIT will be able to use less space than the checked out files even with some history.
References
More Information
Free
- gitcore-tutorial is a basic tutorial from the GIT manual pages
- gittutorial and gittutorial-2 are a bit more advanced tutorials also from the GIT manual pages
- Pro Git book, freely available online (and for purchase as a printed version)
For purchase
- Pragmatic Guide to Git (printed and/or e-Book)
- Pragmatic Version Control Using Git (printed and/or e-Book)
- Version Control with Git (printed and/or e-Book)